Monday, February 28, 2011

My First DIY Project: Framing a Photo Strip

Let me introduce me to my first ever makeover project, long before I ever did makeovers or had a blog :)  On our honeymoon hubby and I had the most adorable photo strip taken at a photo booth.  I wanted to frame it and hang it in our home because I loved it, but apparently no one makes frames for photo strips.  Fast forward to about 7 months after we got home from our honeymoon.  We were shopping at Fred Meyer and walked past this ugly framed palm tree.
 It didn't even click in my head that it was exactly what I was searching for until I had already walked several steps past it.  Suddenly it clicked in my head and I immediately snatched the ugly framed tree and purchased it.
 I spray painted the frame (this was back before I had my own spray paint and had to borrow some from my hubby's work van :) ) and then cut a sheet of black card stock to put inside.  I put clear photo corners on our honeymoon photo strip, matted it on more black card stock and matted that on some white burlap scrapbook paper.
I really love the way it turned out and 6 years later I still love having it displayed in my home :)
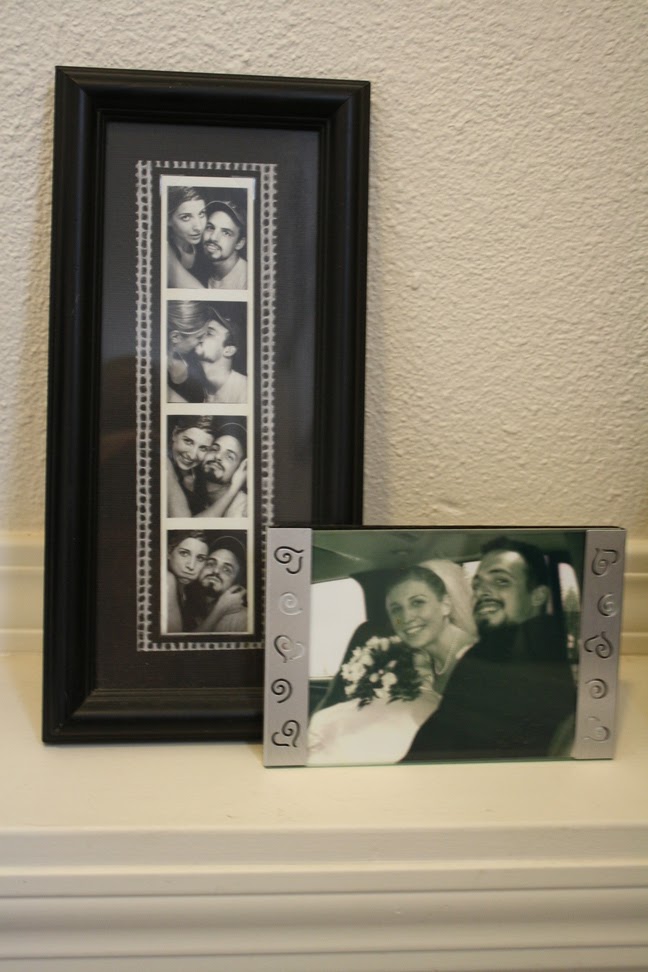
Here it is today on the ledge on my stairwell with a wedding picture.  So, do you have any special way of displaying a photo strips because I have two more really cute ones :)

5 Years Later.........

I bought this custom mat and frame 5 years ago from a company that does specializes in custom special occasion mats.  I bought it to put wedding pictures in.  But I never did.  Instead it sat empty.  In my bedroom.  For.5. years!
So, while I was cleaning and organizing in our master bedroom I came across this frame again and decided it was finally time to put it to use.  I decided to do family pictures instead of wedding pictures and I LOVE how it turned out.  I also surprisingly love the combination of b&w, sepia, and color photos!
And the hearts cut in the corners for wedding photos work really well with pictures of us and our sweet baby :)  In the caption box I wrote:  "And Baby Makes Three.
I put it on top of my china hutch with a carved elephant from African and two vases.  I like walking by and seeing pictures of my sweet family :)
The full view

Sunday, February 20, 2011

Finishing Touches on the Nursery

 I finally just finished the last two projects I had for the nursery.   I wanted to make a memo board that I could display photos on in Jeremiah’s nursery that matched the turtle theme, so I cut out some turtles  on my cricut and added them to a canvas that I pained with some blue and brown.  Then I covered some cloths pins with the same of the paper I cut the turtles out of.
I glued the cloths pins to the canvas to make a cute little memo board.
A close up of the turtles on the memo board.
 
I also made this great turtle lamp.  I got it at a thrift shop a few months ago because it was the perfect colors to compliment the nursery.  I couldn’t find one anywhere that matched, so i decided to make one :)
Close up of the turtles and bubbles I made.
I also put a turtle on the ceramic base.
 With the light on.
 I think it matches the rest of the nursery really well!  I love my son's nursery!  It is one of my favorite rooms in the house.  I still love to sit in the nursery and rock my son to sleep.  It is just so fun and calm.  My favorite place in the world is Hawaii and I just love the way the turtles and ocean theme remind me of it!  To see the full view of my baby's adorable you can go here.
Linking up to:
It's a Crafty Life

Tuesday, February 8, 2011

My New Vanity Shelf! :)

Introducing my new vanity shelf. I need some place to hold my make up and perfume bottles and jewelry and such since the dresser with the hutch that held such things before is now in the baby's room. We found this cabinet/shelf  for $10 the week before I left for Africa and it SCreaMed potential at me. Please Paint me white and distress my edges I heard it say. Put your pretty perfume bottles and your Grandma's pitcher on my shelf. Well I listened and I am super excited! This is going to be beautiful!!! I am going to sand it down and Mike is going to spray it bleached almond (creamy white) for me with his new paint sprayer and cut a piece of mirror for the inside where the beadboard is. Then I am going to add crystal glass knobs to the doors and hang it in the master bedroom. Now I just need to find a cute tall chair to go with it!
 Loving the beadboard!
And the row of hangers at the bottom!
 
And the cabinet to hide my makeup and things.
I was super excited about this project and posted about last March.  Almost a year ago.  But I got it the week before I went to Africa, and the whole week before I left it rained.  And rained.  And rained!  So we couldn't paint it.  Then I was gone for 4 months and when I got home I had a new baby, so it took me a while to get back to this one :)  But it was worth the wait!!  I have been wanting to post pictures for a while, but hubby's paint sprayer malfunctioned while he was doing the doors and he had to sand them down and re-do them.  He hasn't gotten around to putting the last coat on, so I haven't posted pictures yet.  But he is super busy with a work project right now, so if I keep waiting on the doors it might be a while :)
Drumroll please................................
TADA!!
With the mirror Mike added and the shelf space for my make-up it is the perfect place to get ready in the morning.


 But it was so crowded with all of my cosmetics. 
The messy look was driving me crazy without the doors back on yet!
 So I tidied up.  I shopped my house and grabbed the orange glassbaby candle holder for my make-up brushes and my Great Grandma's antique bowl and hair receiver for some organization.  I stacked my foundations and put my most often used eyeshadows in the bowl and then stacked it on the rest of the eyeshadows.  It is functional, organized, and PRETTY now!!
 
Before                                             After         
I just LOVE it!  and aren't the pegs great for holding my African hand bag, my favorite bulky necklaces, my Hawaiian shell leis, and my hair ties?  And on the very top I have dried flowers from bouquets my hubby has given me over the years :)  
I will be linking up to:

Wednesday, February 2, 2011

Musical Wreath

At the end of November when we put our Christmas tree up I decided I was over my tree topper so I was going to make a new one.  I don’t know what I was thinking size wise, but when I started making it it was clear that it was going to be WAY too big!  Sooo, I set it aside and had plans to turn it into a wreath later.  I sized down my model and ended up with this topper:

I love the way it turned out and just the look of it.  I am all about vintage and it looked vintage to me with the antique sheet music.
After all of the work of inking the edges of the music and turning the sheets into cones and then hot gluing them all together I was kind of over it.  I also finished around 2am so that might have killed some of my enthusiasm right there.  Anyway, I decided to wait a few days to do the wreath.  With the busyness of the Christmas season I never did get around to finishing it.  It has been taking the majority of my scrapbook work surface since then, so today I decided it was time to finish the thing!  It was only about a quarter of the way done and since it is such a HUGE wreath it actually took several hours to finish with inking the edges and everything from start to finish.  It was sooooo worth it though! And, bonus, now I have my scrap area back!
Coming together.  I had to make  LOT of cones!!!
Once I had enough cones made to complete the wreath I hot glued some cardboard strips  into ring and then glued the cones the that.  The whole process was very labor intensive and I have no desire to make another one in the near future!  But it turned out beautiful and is one of my favorite things in my house right now!!
You really can’t tell how big it is from this shot but it is almost 2 1/2 feet across.
It is beautiful and makes a big statement.  I think it would look good at Christmas with it’s matching baby on top of the tree, but without Christmas decorations in the house it doesn’t scream holiday, it just looks simple, stunning, and compliments the rest of my decor.
If I had the inclination to make another (which I don’t!!!) I think It would look really pretty with the edges dipped in pink or red glitter for valentines day :)   Even without the glitter I have non-permanent plans to dress this little puppy up for Valentines though!
It is pretty from every angle.  I so love it!!
I will be linking up to:

New Earrings

Back in October when we were in Kaua’i I found a really unique pair of earrings.  I have been to Hawaii several times and I had never seen any like this.  I loved the Olivine and after thinking about it for a day I decided to go back to the street fair to get them and the matching necklace the morning we flew to Oahu.  I loved them!!  Sadly, a few nights later on a long walk one of my Olivine earrings fell off of the hook.  We had done a ton of walking after dinner.  I knew they had to be at the restaurant we went to for dinner, or somewhere we walked afterward because I had put them in right before we went out to eat and Mike said they were on during dinner.  So, we spent 2 hours re-tracing our steps that night but never found it.  I could have cried!  And I never found any on Oahu to replace them.  I did find a pair of olivine earrings with smaller stones and bought them hoping I could combine them with the larger stones from the earring I had left and create a new pair.  Today during nap time I decided it was time to try to make them.
 Here is the earring I had left.
So I took apart all three earrings and threaded the stones onto two earring posts combining the larger stones with the smaller ones.
I had these posts in a box of beads my Mom gave me from her jewelry making days in high school.  After I had the right amount of stones on I added the earring hooks so I could wear them :)
I think they turned out pretty good especially considering I have never made earrings in my life!
Ah, I love them!  And I certainly hope my craftsmanship was better than the original artisan because I will be crushed if one of them falls off the hook again!
I had so much fun I decided to make another pair!  In the box of beads my Mom gave me when I was a child I found the beads from a broken rosary.  I called my Mom and asked whos it was, but she couldn’t recall.  Anyway, the sparkly blue beads called to me and I needed to make a second pair.  I only had one more pair of hooks left, so I tried out a few designs before I settled on one.
I love how they turned out.  So pretty and sparkly!
I love them!  Don’t mind me holding my hair back out of  my face.  Also, you might notice my wardrobe is different.  After I hugged hubby when he got home from work I noticed I had something icky on my shirt.  Apparently he had saved a little lunch on his jacket and decided to share….how sweet. lol
I went into this project trying to fix/re-create my Olivine earrings and ended up with two new pairs of beautiful earrings :)
I will be linking up to: