Tuesday, March 15, 2011

One Year Ago Today......

A year ago today I was a ball of nervous energy.  I was up at 6am (way early for me!!) and ready to go.  My bags were all packed full of diapers and formula and tiny clothes for a tiny 5.5 month old boy halfway around the world that I had never met.  My son.  In the months of waiting occasionally news about him would filter through my email or over my facebook.  January 28th:  I opened my email account to see the most amazing email I had ever received.  Inside were our first 4 pictures of him after months of waiting!  I sat in front of the computer crying silent tears at the beauty of seeing my son's face for the first time.  He was such a gorgeous and TINY baby.  February 5th:  Jeremiah laughed out loud for the first time! came through my facebook.   March 5th:  "Jeremiah ate his first baby food today.  Lamb dinner and peaches.  He loved it!" in an email.  March 10th:  9 more pictures of our son came in an email from a young lady who had been in Uganda in February.  They were beautiful and full size, so I could print them.  The first ones were so pixelated I couldn't, so this was truly a gift!  Within 3 hours I had them uploaded to costco.com, picked them up and had them framed all over the house!  I only had 4.5 days left at home, but I wanted to see his face as much as I could! :)

By 11am exactly a year ago I was at the airport.  Mike walked in the long security line with me.  I was holding back my tears as we held hands in line and then I hugged and kissed him goodbye.  He would join me in Uganda 3 weeks later.  I cried like a baby after I had to go through the security checkpoint by myself.   I knew I was going to miss Mike  like crazy.  I am sure the guy in line behind me thought I was just plain crazy!  He kept giving me worried sideways looks because I was crying.  Then after 24 exhausting hours of traveling I was there.  The airplane touched down around 11pm Ugandan time in the darkest city I had ever seen.  It seemed like there was hardly enough runway light for the plane to land.  But it did.  As soon as I stepped out of the airplane hot wet air enveloped me.  I followed everyone on my plane to the visa line.  I was the last person in line because I had to wait for my stroller to come up to the jetway from the plane's belly.  It wouldn't have mattered though.  I was in Africa and it was time to wait.  My first experience with "African time."  After two hours of waiting in line the man took my passport, gave it a cursory glance, asked me a couple of questions, and in less than a minute my visa was stamped!  Finally I was able to get my luggage and find my ride.  Brian and David had been waiting on me for a long time.  Brian told me about the landscape and what we were passing on the way "home" but it was too dark to see much.  People had candles and oil lamps outside because they had no electricity.  Even though the traffic was very light considering the late hour they drove like crazy people!  We traveled on dirt roads that were more rut than road and finally we were there.  We talked for a while and then I found my room and unpacked.  I stayed up late writing in my journal.  I was too excited to sleep.  I was meeting my son in the morning!!  I slept with my light on all night because I was scared of the bugs and finally it was morning.

At 9am Rennie brought my son in.  I handed Brenda my camera and walked over.  It was like slow motion.  I dissolved into tears as I stared at the beautiful baby.  It took a long time before I could even pick him up and take him from Rennie.  First I held his small hands and feet and stroked his soft cheeks.   With tears on my cheeks I inspected every inch of him, this soft brown baby of mine.  Finally I lifted him into my arms and held him against me for the first time.  I snuggled him and told him that I had been waiting my whole life for him.  I held him up and looked into his eyes.  He just stared at me with wide eyes taking everything in.  Rennie said he was looking at me as if he knew I was his Mama.  As if he had been waiting for me.  They brought him to me in time for a feeding so I sat down and rocked my baby, feeding him for the first time.  He had such a sweet and happy spirit and watched me the whole time as he sucked away at his bottle.  He seemed very content to belong to me.  To be someone's baby.  To be mine.  And I was all too happy to be his!

Meeting my son for the first time.  I was overwhelmed with love and emotion!
Finally in my arms instead of just my heart.
Mama and Baby
In Love!
 And here is my little man this morning, exactly one year later.

New Duds

I have been looking for a shirt with the continent of Africa on it for J for a long time.  Every time I would find someone doing an adoption fundraiser with silk screened shirts with Africa on them they were sold out in toddler sizes.  So I finally decided to make one.  I went to JoAnns to pick up some cute fabric and some heat and bond and went to work.  I had this sweatshirt that Jeremiah just grew into and since it is March my little Ugandan American boy is cold, so it was perfect:
 I cut out the shape of Africa in the cute fabric I found and then ironed it on according the the directions on the heat and bond.  Then I added a patch in the shape of a heart over Uganda.  Finally I stitched around the whole thing.
I am in love with how it turned out!
I think he likes it!
I make this shirt look good!
I am really pleased with how this turned out and I love that he has an Africa shirt now!
Once I had the shirt making bug I couldn't stop!  I decided to make a little leprechaun shirt for him for St. Patrick's day.  I had read on another blog that you can cut a shape out of freezer paper and then iron the outline onto a onsie.  Then you would have a stencil to use fabric paint and paint an image on the shirt.  Sadly my freezer paper would not stick.  I made sure it was shiny side down and everything.  Maybe it was old, I don't know, but it didn't work for me.  So, I held it down REALLY carefully and painted the shamrock on the shirt careful not to get any paint under the freezer paper.
Sorry, I forgot to take a picture before I got the onsie wet to put in the dye bath.
Waiting, waiting, waiting.....
TADA!!!
My little leprechaun :-)
I had also made a smaller shamrock stencil for his booty.  That one didn't stick either.
Now all we need is some corned beef, cabbage, and a cold glass of green beer for Daddy :)
Inspecting his shirt.  I think he likes it :)
The End! :)
P.S. I have had so much fun making these I have 3 more shirts for him in the works!

Monday, February 28, 2011

My First DIY Project: Framing a Photo Strip

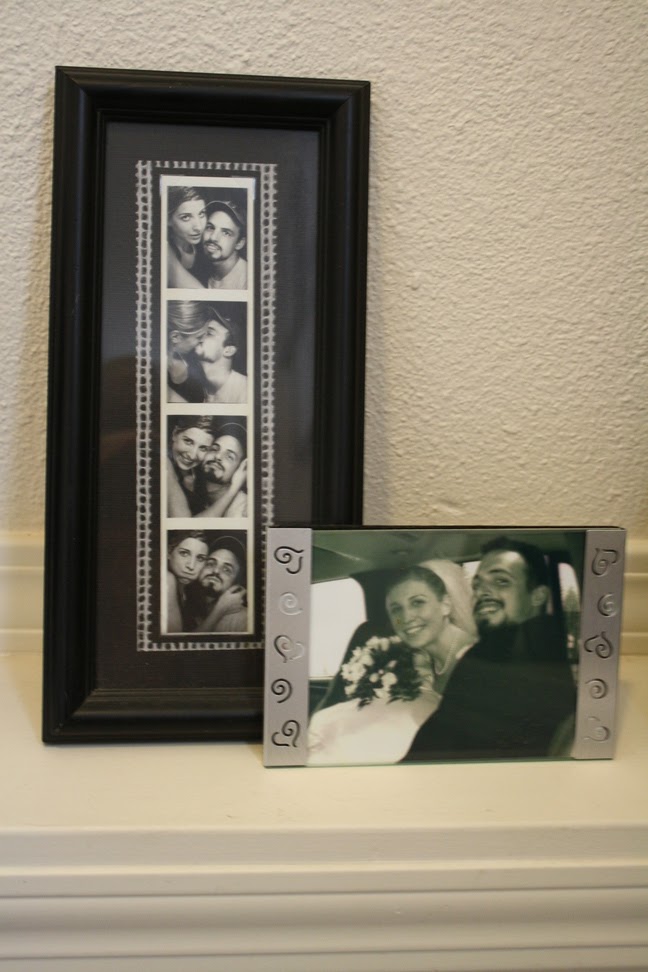
Let me introduce me to my first ever makeover project, long before I ever did makeovers or had a blog :)  On our honeymoon hubby and I had the most adorable photo strip taken at a photo booth.  I wanted to frame it and hang it in our home because I loved it, but apparently no one makes frames for photo strips.  Fast forward to about 7 months after we got home from our honeymoon.  We were shopping at Fred Meyer and walked past this ugly framed palm tree.
 It didn't even click in my head that it was exactly what I was searching for until I had already walked several steps past it.  Suddenly it clicked in my head and I immediately snatched the ugly framed tree and purchased it.
 I spray painted the frame (this was back before I had my own spray paint and had to borrow some from my hubby's work van :) ) and then cut a sheet of black card stock to put inside.  I put clear photo corners on our honeymoon photo strip, matted it on more black card stock and matted that on some white burlap scrapbook paper.
I really love the way it turned out and 6 years later I still love having it displayed in my home :)
Here it is today on the ledge on my stairwell with a wedding picture.  So, do you have any special way of displaying a photo strips because I have two more really cute ones :)

5 Years Later.........

I bought this custom mat and frame 5 years ago from a company that does specializes in custom special occasion mats.  I bought it to put wedding pictures in.  But I never did.  Instead it sat empty.  In my bedroom.  For.5. years!
So, while I was cleaning and organizing in our master bedroom I came across this frame again and decided it was finally time to put it to use.  I decided to do family pictures instead of wedding pictures and I LOVE how it turned out.  I also surprisingly love the combination of b&w, sepia, and color photos!
And the hearts cut in the corners for wedding photos work really well with pictures of us and our sweet baby :)  In the caption box I wrote:  "And Baby Makes Three.
I put it on top of my china hutch with a carved elephant from African and two vases.  I like walking by and seeing pictures of my sweet family :)
The full view

Sunday, February 20, 2011

Finishing Touches on the Nursery

 I finally just finished the last two projects I had for the nursery.   I wanted to make a memo board that I could display photos on in Jeremiah’s nursery that matched the turtle theme, so I cut out some turtles  on my cricut and added them to a canvas that I pained with some blue and brown.  Then I covered some cloths pins with the same of the paper I cut the turtles out of.
I glued the cloths pins to the canvas to make a cute little memo board.
A close up of the turtles on the memo board.
 
I also made this great turtle lamp.  I got it at a thrift shop a few months ago because it was the perfect colors to compliment the nursery.  I couldn’t find one anywhere that matched, so i decided to make one :)
Close up of the turtles and bubbles I made.
I also put a turtle on the ceramic base.
 With the light on.
 I think it matches the rest of the nursery really well!  I love my son's nursery!  It is one of my favorite rooms in the house.  I still love to sit in the nursery and rock my son to sleep.  It is just so fun and calm.  My favorite place in the world is Hawaii and I just love the way the turtles and ocean theme remind me of it!  To see the full view of my baby's adorable you can go here.
Linking up to:
It's a Crafty Life

Tuesday, February 8, 2011

My New Vanity Shelf! :)

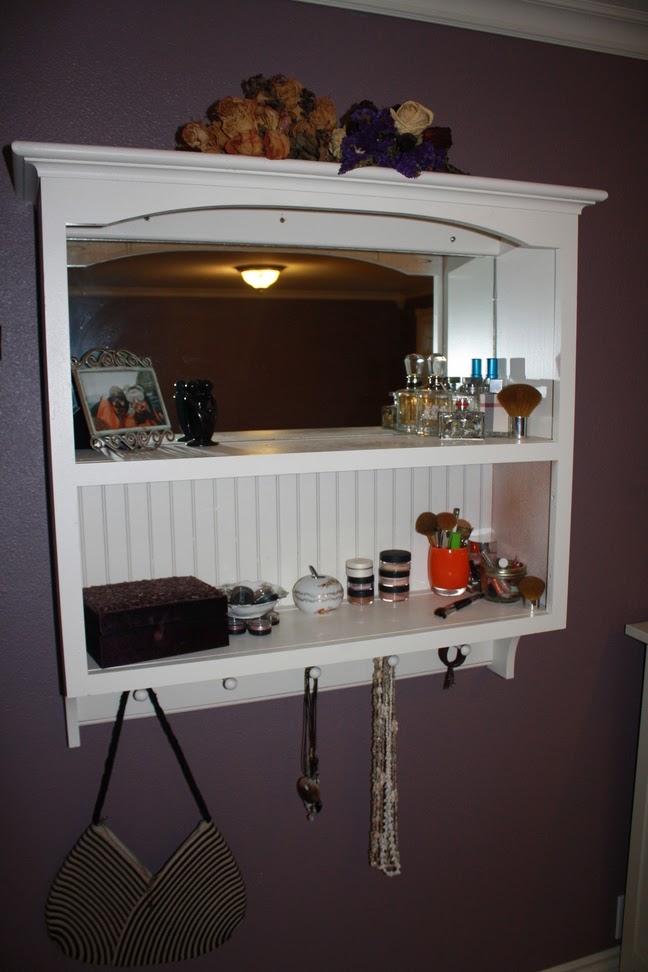
Introducing my new vanity shelf. I need some place to hold my make up and perfume bottles and jewelry and such since the dresser with the hutch that held such things before is now in the baby's room. We found this cabinet/shelf  for $10 the week before I left for Africa and it SCreaMed potential at me. Please Paint me white and distress my edges I heard it say. Put your pretty perfume bottles and your Grandma's pitcher on my shelf. Well I listened and I am super excited! This is going to be beautiful!!! I am going to sand it down and Mike is going to spray it bleached almond (creamy white) for me with his new paint sprayer and cut a piece of mirror for the inside where the beadboard is. Then I am going to add crystal glass knobs to the doors and hang it in the master bedroom. Now I just need to find a cute tall chair to go with it!
 Loving the beadboard!
And the row of hangers at the bottom!
 
And the cabinet to hide my makeup and things.
I was super excited about this project and posted about last March.  Almost a year ago.  But I got it the week before I went to Africa, and the whole week before I left it rained.  And rained.  And rained!  So we couldn't paint it.  Then I was gone for 4 months and when I got home I had a new baby, so it took me a while to get back to this one :)  But it was worth the wait!!  I have been wanting to post pictures for a while, but hubby's paint sprayer malfunctioned while he was doing the doors and he had to sand them down and re-do them.  He hasn't gotten around to putting the last coat on, so I haven't posted pictures yet.  But he is super busy with a work project right now, so if I keep waiting on the doors it might be a while :)
Drumroll please................................
TADA!!
With the mirror Mike added and the shelf space for my make-up it is the perfect place to get ready in the morning.


 But it was so crowded with all of my cosmetics. 
The messy look was driving me crazy without the doors back on yet!
 So I tidied up.  I shopped my house and grabbed the orange glassbaby candle holder for my make-up brushes and my Great Grandma's antique bowl and hair receiver for some organization.  I stacked my foundations and put my most often used eyeshadows in the bowl and then stacked it on the rest of the eyeshadows.  It is functional, organized, and PRETTY now!!
 
Before                                             After         
I just LOVE it!  and aren't the pegs great for holding my African hand bag, my favorite bulky necklaces, my Hawaiian shell leis, and my hair ties?  And on the very top I have dried flowers from bouquets my hubby has given me over the years :)  
I will be linking up to:

Wednesday, February 2, 2011

Musical Wreath

At the end of November when we put our Christmas tree up I decided I was over my tree topper so I was going to make a new one.  I don’t know what I was thinking size wise, but when I started making it it was clear that it was going to be WAY too big!  Sooo, I set it aside and had plans to turn it into a wreath later.  I sized down my model and ended up with this topper:

I love the way it turned out and just the look of it.  I am all about vintage and it looked vintage to me with the antique sheet music.
After all of the work of inking the edges of the music and turning the sheets into cones and then hot gluing them all together I was kind of over it.  I also finished around 2am so that might have killed some of my enthusiasm right there.  Anyway, I decided to wait a few days to do the wreath.  With the busyness of the Christmas season I never did get around to finishing it.  It has been taking the majority of my scrapbook work surface since then, so today I decided it was time to finish the thing!  It was only about a quarter of the way done and since it is such a HUGE wreath it actually took several hours to finish with inking the edges and everything from start to finish.  It was sooooo worth it though! And, bonus, now I have my scrap area back!
Coming together.  I had to make  LOT of cones!!!
Once I had enough cones made to complete the wreath I hot glued some cardboard strips  into ring and then glued the cones the that.  The whole process was very labor intensive and I have no desire to make another one in the near future!  But it turned out beautiful and is one of my favorite things in my house right now!!
You really can’t tell how big it is from this shot but it is almost 2 1/2 feet across.
It is beautiful and makes a big statement.  I think it would look good at Christmas with it’s matching baby on top of the tree, but without Christmas decorations in the house it doesn’t scream holiday, it just looks simple, stunning, and compliments the rest of my decor.
If I had the inclination to make another (which I don’t!!!) I think It would look really pretty with the edges dipped in pink or red glitter for valentines day :)   Even without the glitter I have non-permanent plans to dress this little puppy up for Valentines though!
It is pretty from every angle.  I so love it!!
I will be linking up to: